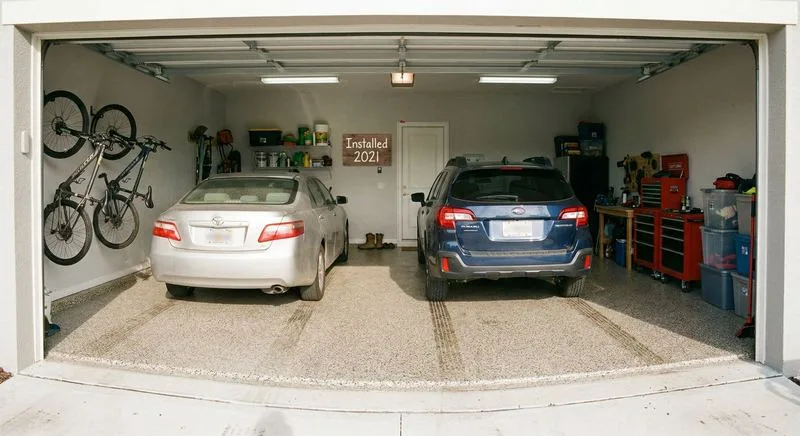
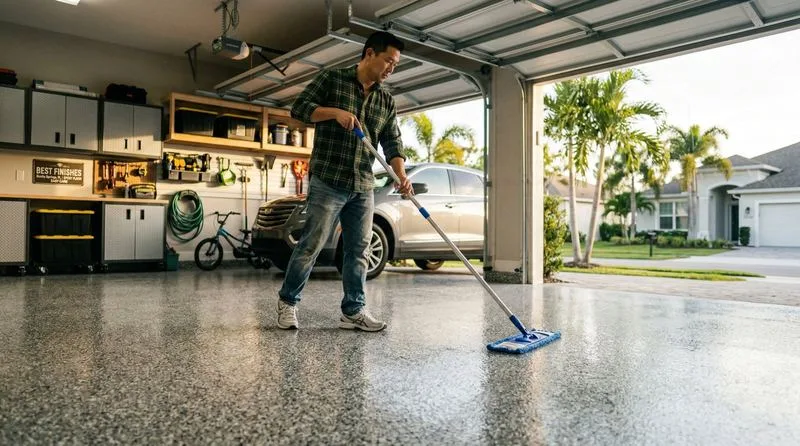
Garage Floor: 5 Years of Daily Abuse
Professional decorative flake epoxy installed in a residential 2-car garage shows minimal wear after five years of daily vehicle parking, workshop use, and exposure to road salt, oil drips, and temperature cycling from -10°F winters to 95°F summers.
The floor retains its color, flake integrity, and structural bond. Tire marks — the #1 aesthetic concern for garage owners — continue to wipe off with standard degreaser, just as they did on day one. There's no peeling anywhere, no bubbling, no hot tire pickup, and no delamination at edges or joints. The only visible change after five years is slight surface dulling in the highest-traffic tire paths where daily driving friction gradually wears the topcoat's outermost layer. From standing height, the floor looks identical to its 6-month appearance.
This result isn't unusual — it's the expected outcome of professional installation with proper surface preparation, commercial-grade materials, and a UV-resistant topcoat. The floors that fail are the ones that skipped one of these steps. Learn about our garage epoxy systems.
What These Floors Actually Endure
Professional epoxy withstands daily vehicle parking, dropped tools, dragged equipment, road salt, oil drips, and temperature cycling without visible damage — year after year. These floors aren't in climate-controlled showrooms. They're in working garages.
Ready to transform your space?
Get a free, no-obligation quote from your local Ascent Epoxy team.
Get a Free QuoteHere's what the tracked floors handle on a typical week: two vehicles parked and driven daily (hot tires, cold tires, wet tires), power tools dropped from workbench height, kids' bikes and scooters dragged across the surface, road salt and sand tracked in on tires and shoes throughout winter, oil and coolant drips from routine car maintenance, heavy rolling toolbox wheels, rubber storage bins slid across the floor during seasonal reorganization, and pet traffic (claws, water bowls, muddy paws).
Professional-grade epoxy at 10–20+ mils thickness is engineered for exactly this kind of abuse. The coating absorbs impacts, resists chemical penetration, and maintains its bond through thermal cycling that would destroy paint, thin sealers, and DIY kits. Read about all 7 advantages of epoxy flooring.
The Three Factors That Determine Longevity
Three factors separate floors that look new after 5+ years from those that fail in 2 — and all three must be present. Remove any one, and the floor eventually fails regardless of the other two.
1. Surface preparation. Diamond grinding creates a permanent mechanical bond between the epoxy and the concrete. The grinding profiles the concrete to CSP 2–3, creating thousands of microscopic "teeth" per square inch that the epoxy grips permanently. Acid etching (used in DIY kits) creates a surface that LOOKS clean but doesn't have the mechanical profile for lasting adhesion. This is why DIY floors peel — the bond was never strong enough to begin with.
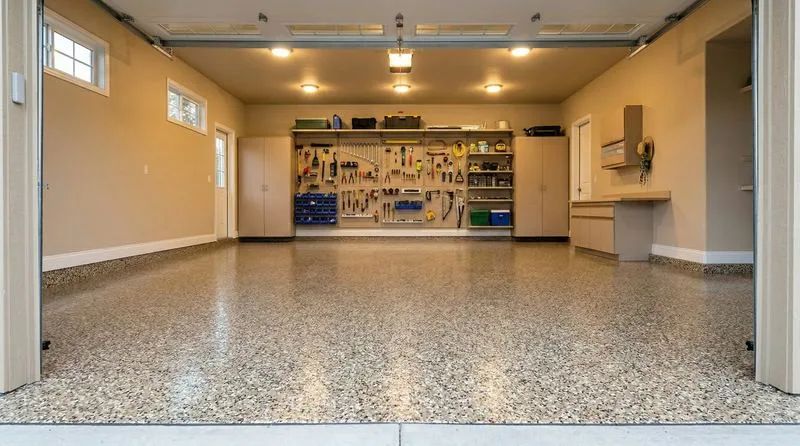
2. Coating thickness. Professional systems apply 10–20+ mils of total dry film thickness across three layers (primer, body coat, topcoat). DIY kits apply 2–5 mils in a single layer. The difference: a 15-mil coating absorbs impacts, resists abrasion, and distributes tire heat across enough material to maintain its integrity. A 3-mil coating has no margin — every impact, every hot tire cycle, every dragged object chips away at a surface that's barely there.
3. Topcoat quality. The clear UV-resistant topcoat is the shield that protects everything underneath. It prevents yellowing from sunlight exposure, provides chemical resistance against oil, salt, and cleaning products, and adds the abrasion resistance that handles daily foot and tire traffic. Without a quality topcoat, the decorative body coat is exposed directly to UV, chemicals, and friction — and it degrades visibly within 1–2 years. See why these three factors make DIY fail.
What to Expect: Year by Year
DIY vs. Professional: The 2-Year Contrast
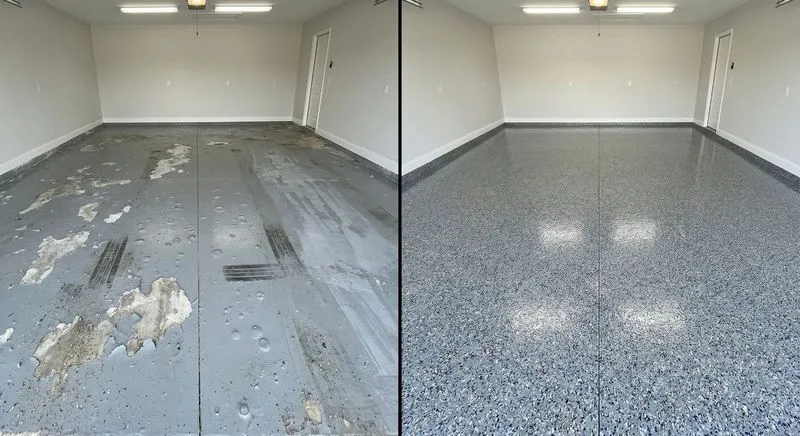
DIY epoxy shows extensive peeling, hot tire damage, and bubbling after just 18 months, while professional installations show zero failures after years of identical daily use. The contrast is stark and consistent across every comparison we've documented.
Both floors started on the same type of concrete, in the same type of garage, with the same daily demands — two vehicles, tools, road salt, temperature swings. The only difference is preparation (acid etching vs. diamond grinding), materials (2–5 mils vs. 10–20+ mils), and application technique (homeowner weekend project vs. trained professional crew).
The timeline of DIY failure is predictable: months 1–6, the floor looks great. Months 6–12, minor peeling appears at edges and where hot tires sit. Months 12–18, the peeling spreads, bubbles form where moisture is trapped, and tire-shaped patches of missing coating appear. By month 24, the floor looks worse than the bare concrete it replaced — and the homeowner faces a remediation bill larger than a professional install would have cost originally. Read our complete DIY vs. professional comparison.
Want a Floor That Looks This Good in 5 Years?
Get a free quote for professional epoxy installation — the kind that actually lasts.
Get a Free Quote (954) 852-1263How Commercial Floors Age
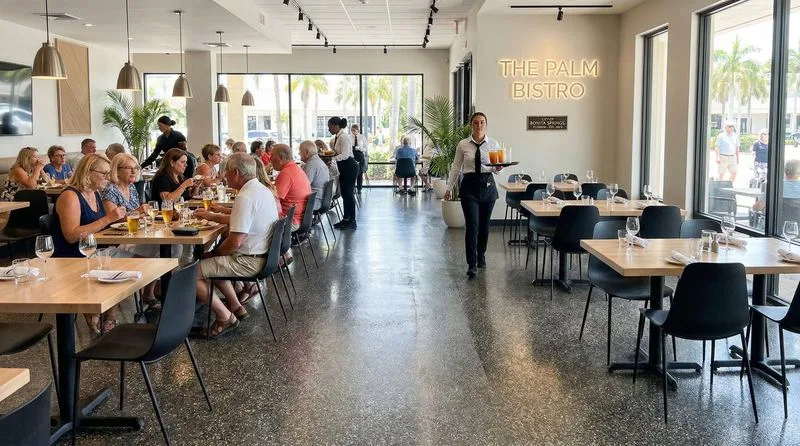
Commercial epoxy floors face even more demanding conditions than residential garages — hundreds of daily footsteps, rolling carts, chair legs, dropped items, and constant cleaning with commercial chemicals. Despite this, professionally installed commercial epoxy routinely lasts 10–15 years in high-traffic environments like restaurants, retail stores, and office lobbies.
The key differences in commercial aging versus residential: wear patterns are more distributed (foot traffic covers the entire floor, not just tire paths), cleaning frequency is higher (daily mopping vs. weekly in residential), and the UV exposure varies (retail with large windows ages differently than a windowless kitchen). The overall result is a more even, gradual dulling of the topcoat rather than the localized tire-path wear seen in garages.
Restaurant floors — arguably the toughest commercial environment — show the most character over time. The quartz aggregate surface handles spills, dragged chairs, and aggressive nightly cleaning while maintaining slip resistance and structural integrity. Color remains consistent. The seamless surface means no grout to deteriorate (the #1 reason restaurants replace tile floors). After 5 years of full-service operation, a quartz epoxy restaurant floor looks better than a tile floor after 2 years. See our commercial kitchen flooring guide.
How Maintenance Affects Longevity
The floors we tracked that look best after 5+ years share one habit: regular sweeping. This single practice has more impact on long-term appearance than any other factor after installation quality.
Why sweeping matters so much: grit, sand, and small debris particles act as sandpaper under foot and tire traffic. Every step and every tire rotation grinds these particles against the topcoat surface. Over weeks and months, this micro-abrasion dulls the topcoat faster than normal wear alone. Regular sweeping removes the abrasive material before it can do damage — preserving the topcoat's gloss and protective properties significantly longer.
The floors that showed the most wear at the 5-year mark were consistently in environments where sweeping was neglected for weeks or months at a time — garages where sawdust and metal shavings accumulated, or commercial spaces where daily sweeping was skipped during busy periods.
The Complete Maintenance Routine
Professional epoxy requires remarkably little maintenance, but doing it right extends the floor's life and appearance dramatically. Here's the specific routine we recommend:
Daily (garages) or 2–3 times weekly (interior): Sweep with a soft-bristle broom or microfiber dust mop. This takes 5 minutes for a 2-car garage. Focus on tire paths and entry areas where grit accumulates fastest. This single habit is the most important thing you can do for your floor.
Weekly or as needed: Damp mop with warm water and a few drops of mild pH-neutral cleaner (like Simple Green diluted 10:1). No harsh chemicals needed — the sealed surface releases dirt easily. Avoid acidic cleaners (vinegar, citrus-based), ammonia, and abrasive scrubbing pads — they're unnecessary and can dull the topcoat over time.
Monthly (garages): Hose down the floor with clean water to remove road salt buildup (winter) and fine dust accumulation. If tire marks are visible, apply a small amount of degreaser, let it sit for 2–3 minutes, and mop away. Tire marks on flake epoxy are surface-level and always removable.
Never: Use steel wool, abrasive scouring pads, or pressure washers on epoxy. Steel wool scratches the topcoat. Pressure washers at close range can damage the coating edge at transitions. Neither is necessary — the non-porous surface releases everything with basic mop-and-degreaser cleaning.
When to Consider a Re-coat
Most professional epoxy floors don't need a re-coat for 10–15 years in residential settings and 7–12 years in commercial environments. The timeline depends on traffic intensity, maintenance habits, and UV exposure.
Signs that a re-coat is approaching: visible loss of gloss in high-traffic areas that doesn't return after cleaning, slight roughness where the topcoat has thinned (you can feel the texture change underfoot), or minor scratches that are becoming numerous enough to affect appearance. None of these indicate structural failure — the primer and body coat underneath remain perfectly bonded and functional. Only the topcoat's protective layer needs refreshing.
A re-coat is a one-day process: the crew lightly sands the existing surface to create adhesion for the new topcoat, applies a fresh clear coat, and the floor is walkable the next day. Cost is typically 25–35% of the original installation — roughly $800–$1,200 for a 2-car garage. The result is a floor that looks and performs like new, with the clock reset on the topcoat's life. Learn about our re-coating and repair services.
This re-coatability is a unique advantage over alternative flooring. Tile can't be "re-coated" — damaged grout must be chipped out and re-grouted. Hardwood must be fully sanded to bare wood and refinished. Polished concrete must be re-ground from scratch. Epoxy's simple topcoat refresh is faster, cheaper, and less disruptive than any alternative's renewal process. See our full epoxy vs. polished concrete comparison.
Your Floor Could Look Like This in 5 Years
Professional epoxy flooring delivers on its promise of long-term durability — and the proof is in the floors we've tracked for years across hundreds of installations. Five years of daily abuse produces minimal cosmetic change and zero structural failure when the installation is done right.
The investment in professional surface preparation, commercial-grade materials, and a proper three-coat system pays off every single year the floor remains in excellent condition. At the 5-year mark, a professional epoxy floor has cost its owner zero dollars in maintenance, zero hours of refinishing, and zero stress about its condition. A DIY floor installed on the same day is typically on its second or third re-do — if the homeowner hasn't given up and covered it with rubber mats.
The math is simple: invest once in professional installation, and your floor will look like the photos in this article for the next decade. See what professional installation costs. Learn what the installation process looks like. Or, if you're ready: